Twin blogs

Monday, 26 November 2012

ArcheOS 4 software list

Hi all,
to answer Salvatore Schimenti's question on ArcheOS FaceBook page, I report here the complete software list of version 4.0 (codename Caesar). Soon, with a series of short post, I will also try to describe the main archaeological applications of each software. The list is also available on github ArcheOS wiki.

ArcheOS v.4 (Caesar) software list


CAD QCAD Professional 2D CAD system
CAD FreeCAD Extensible Open Source 3D CAx program
DB pgadmin3 Database design and management application (for PostgreSQL)
DB phpPgAdmin Web-based administration tool (for PostgreSQL)
DB pgDesigner Datamodel designer (for PostgreSQL)
DB PostgreSQL Object-relational SQL database
DB PostGIS Geographic objects support for PostgreSQL
DB sqlite3 Embeddable SQL Database
DB SQLite Data Browser Visual tool used to create, design and edit database files (for SQLite)
DB spatialite Extension to support spatial data (for SQLite)
DB spatialite-gui User friendly GUI (for SQLite)
DB spatialite-gis minimalistic GIS tool built on the top of SpatiaLite
DB Tellico Collection manager for books, videos, music
Dendrochronology Corina Dendrochronology program
GIS GRASS Geographic Resources Analysis Support System
GIS OpenJump GIS written in the Java
GIS SAGA System for Automated Geoscientific Analyses
GIS QGIS Powerful and user friendly GIS
GIS uDig user-friendly Desktop Internet GIS
GIS gvSIG Tool to manage geographic informations
GPS GpsDrive Car navigation system
GPS GPSBabel Software for GPS data conversion and transfer
Graphics (3D) Blender Fast and versatile 3D modeller/renderer
Graphics (3D) MakeHuman Software to model 3-D humanoid characters
Graphics (3D) Virtual Terrain Project Software to develop 3D digital form. CAD, GIS, visual simulation, surveying and remote sensing, etc...
Graphics (3D) WhiteDune Graphical VRML97 viewer, editor, 3D modeler and animation tool
Graphics (raster) GIMP GNU Image Manipulation Program
Graphics (raster) GwenView Image viewer for KDE 4
Graphics (vector) Alchemy Drawing program for hand-made sketch
Graphics (vector) Inkscape Vector-based drawing program
Graphics (vector) Stippler Stippling software for non-photorealistic shading
Graphics (voxel) ParaView Multi-platform data analysis and visualization application
Internet Icedove Unbranded Thunderbird mail client
Internet Kompozer WYSIWYG web page editing
Laserscan MeshLab System for processing and editing triangular meshes
Office Scribus Professional layout and publishing software
Office OpenOffice Office software suite
Office Texmaker Cross-platform LaTeX editor
Office texlive-fonts-extra Tex package for extra fonts
Office JabRef Bibliography reference manager for BibTex
Photogrammetry stereo Software to extract 3D objects or surfaces within stereo photographs or images
Photogrammetry e-foto Digital photogrammetric workstation
Single View Reconstruction jSVR Single view reconstruction software in Java
Statistics R Statistical computation and graphics system
SfM-IBM Bundler Structure from Motion software for Unordered Image Collections
SfM-IBM CMVS Software to speed up SfM-IBM procedures (with clustering)
SfM-IBM PMVS2 Multi-view stereo software to reconstruct 3D scenes
SfM-IBM PPT Python Photogrammetry Toolbox: a tool to chain i a single sequence Bundler, CMVS and PMVS2
Total Station Total Open Station Software for downloading and processing data from total station devices
Virtual globe Marble Virtual Globe and World Atlas
WebGIS GeoServer Software to share and edit geospatial data
WebGIS JOSM Editor for OpenStreetMap (OSM) written in Java
WebGIS MapServer Software platform for publishing spatial data and interactive mapping applications to the web
WebGIS pmapper Framework to setup a MapServer application based on PHP/MapScript


ArcheOS logo

Saturday, 24 November 2012

Blender camera tracking + Python Photogrammetry Toolbox


Year by year the growing of Blender come increasing and surprising us. The short movie Tears of Steel proves this, mainly with the new feature of Blender, the camera tracking.


This article will show some tests with this technology in conjunction with Pyhton Photogrammetry Toolbox. Firstly we did an attempt to reconstruct a scene partially with PPT and match it with the footage.


Second, we use the camera tracked and we imported other scene (sphynx) to use the real movement of the camera.

Why use PPT instead a modeling over a picture? 1) Because the reconstruction over a picture is subjective and have the distortion of the perspective. 2) Because scanning complex objects can be easer than modeling it (thing in a statue broken, or an assimetric vase). 3) Because make the texture will be easier when we use the reference pictures. 4) Because you can use the frames of the footage to reconstruct the scene. 4) Because the work of ilumination can be easier cause the texture already be illuminated and the scene (background) be ready.

How can I use the camera tracking in Blender? Make the process can be more easier than you think. A good videotutorial can be found here. Once you have the scene tracked, you can do the reconstruction using PPT.

The image above is a frame of the original footage. How we said, you can use the video to make the reconstruction with PPT. You will have to convert the video in a imagem sequence using FFMPEG, for example (see the previous articles).

The great news, is that we discover (thanks to rgaidao!) an addon that imports Bundler files (bundler.out) inside Blender.


With this, you can receive the cameras with the pictures to project the texture on model.

And produce a model with a great quality of resemblance with the original.

Obs.: Unfortunately this reconstruction wasn't made by Luca Bezzi, the master of PPT reconstruction. So, we did all possible cover using Meshlab and Ball Pivoting reconstruction. This was sufficient to make a model that matched with the original in the important areas.

With the model tracked, reconstructed and matched, you can increase the possibilities of animation to make the impossible... like the picture above, and the videos in the top.

In archaeology, the Blender traking can be used, for example, to reconstruct ancient builds over current ruins.

The uses can be many, your creativity is the limitation.

A big hug!


Saturday, 17 November 2012

Taung Project: 3D with SfM & IBM

This post is published very late, but, due to technical problem, I could not write it before. Among the different articles regarding the Taung Project, this one should be read at the beginning, as it regards the 3D acquisition of the cast we used for the facial reconstruction.
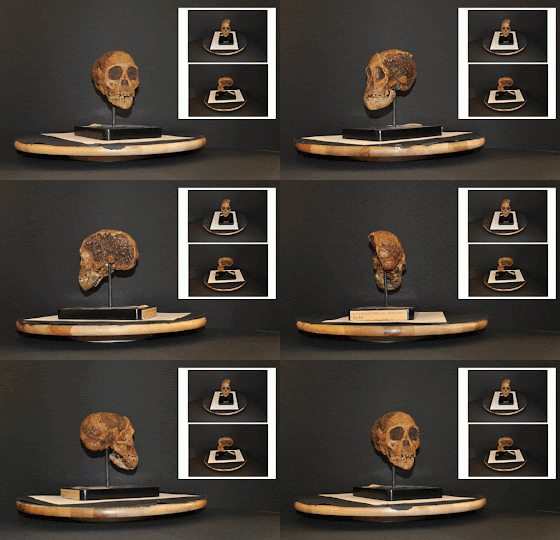
As usual, we tried to choose the best technique to record a 3D digital copy of our subject and, as often happened, the best strategy was to use SfM/MVSR software. Thanks to the versatility of this methodology, all I had to do was set up a makeshift photo laboratory in a free space at the Anthropological Museum of Padua University. The image below shows my temporary workspace.

The makeshift photo lab
Then I took four different series of pictures: two for the cast of the original fossil (with and without flash) and two for a reconstructed cast of the same find (always with and without flash). I used an higher and a lower angle of shooting for each series. The animation below shows the pictures taken from the lower angle (while the two photos on the corner come from the higher corner).


As you can see, to take the pictures I used the same technique of this post. All in all, data acquiring operation did not require very much time (more or less a couple of hours) and the same day I was able to give all the photos to Alessandro Bezzi, who could elaborate them with Pierre Moulon's PPT (in ArcheOS) with his laptop (which is more fast and powerful than mine). Despite what I wrote in the post I mentioned before, this time the post-processing worked perfectly with PPT and Bundler 4, so that just some hours later a raw 3D model was ready to be sent in Brazil, where Cicero Moraes started the facial reconstruction work he described in his three posts (1, 2, 3).

Raw data

In case you want to replicate the experiment, I add some useful link to share the data. As usual in ATOR, they are licensed with Creative Commons.
Here you can download a zipped file with the original pictures. To get the 3D model you can use your favorite SfM - IBM combination of software. If everything work good, you should have a model similar to this pointcloud (you can also see in in the clip below).


If you want to give your model the real metric values, please use the A4 sheet as reference (21 x 29,7 cm), like I did for the find of this post.

Have fun!

Wednesday, 14 November 2012

Geoarchaeology with "terrazzo" tiles.

In this post I would like to describe a geoarchaeological analysis based on tiles built with the “terrazzo” technique. These tiles are made of sedimentary material, coming from the different layers of an archaeological excavation, poured with a cementitious binder (normal Portland cement) and then polished with a lapping machine.
This methodology has many advantages:
  1. It is relatively simple and inexpensive
  2. It allows a sistematic storage of the samples
  3. It allows analysis difficoult to achive (or not feasible) in other ways
Sample preparation

It is better to start with a copious sedimentary sample (at least 1 Kg) and sieve it to define a series of size ranges (16-8 mm, 8-4 mm, 4-2 mm, 2-0,06 mm), that will be used to build the tiles. Then we have to prepare some wooden molds with the preferred size (e.g. 30 x 20 x 5 cm) and to mix the sedimentary material with Portland cemenet, water and 1 dl of Vinavil glue. When the mixture is ready, we can put it in the wooden box and let it dry for a couple of days. After this time, if the cement is hard enough, we have to polish one of the larger faces of the tile with a lapping machine (for this operation we asked the help of a marble cutter). Now the sample preparation is complete (see the image below for an example).

An example of "geoarchaeological terrazzo tile"


Geoarchaeological analysis

The procedure described above allows to build a geoarchaeological archive, storing the sedimentary material of different excavations for future comparison.
The tiles built with the “terrazzo” technique expose a section of the components of the sedimentary material, in which it is possible to observe their genetic colour, their framework (internal structure) and their edge (on a random axis). The same parameters could not be visible on intact samples, due to the small size of the components and to their external surface, which is often dirty and altered.
On one hand, observing the colour and the framework of the sediment, it is possible to do some petrological analysis to determinate the rocks and minerals tipology, which could help in understanding their origin and the spatial distance they covered. On the other hand, the edge of the sediment gives morphologic and morphometric informations, which can explain the kind of transport (and the agent) the material was subject.
In the next days we will try to perform some of these analysis in a GIS to evaluate the potentialities of this kind of software also fo such a specific need.

Sunday, 4 November 2012

Taung Project: 3D Forensic Facial Reconstruction


This article will show the overall process with a timelapse and we'll offer you the file from Blender at the end.

The whole process of 3D modeling took 332 minutes, totaling 5 and a half hour of work and more than 12GB of captured video!

We plan to share the raw video in the future.

Step 1: Muscle Modeling


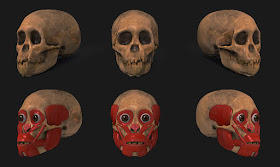
In this step, the skull structure receives the muscles, we use a new way to make this work, with the automatic fill feature of Blender; this after converting the complex mesh in a 4-sided polygon object.


See the timelapse video above.


Step 2: Skin Modeling


In this step we use the same technique of the Alberto's reconstruction. Since the object of reconstruction is an extinct a animal, it is impossible to use tissue depth marks, therefore the reconstruction was based only on the muscles only.


See the timelapse video above.


Step 3: Material & Rendering


This is the last step, when we finished the modeling and did the texturing and we rendering process.


You  can download the Blender file here. (Fixed!)

Screenshot source .blend file

Different of the last articles about facial forensic reconstruction, this article have all the timelapse videos of the modeling phases.

The videos may be fast, but certainly they should prove useful for the comprehension of the process of modeling and rendering, for those that already have some knowledge and want to study further - or event for those that never seen these techniques before.


We hope this post has been useful to you.

A big hug, and see you in the next!

Friday, 2 November 2012

Taung Project: Facial forensic reconstruction 2D – studying for 3D modeling.


In the previous post we showed the process of modeling missing parts of the Taung child skull.
To draw the face was used Inkscape, a vector software, and Gimp, a image editor, both free software

To draw the face was used Inkscape, a vector software, and Gimp, a image editor, both free software.


Before we start working, it is important to study the face of primates and human beings, since the Australopithecus africanus appear more ape than human, however in the case of humans, the documentation of their anatomy is far better documented.


Once the skull was completed it was ready to be rendered.


In order o use an image in a 2D reconstruction process, we need to render with an orthogonal camera.

Now is the time to open Inkscape and start the reconstruction, placing the eyeball. Note that some reference images are placed inside the document. These will help during the drawing process.
Now the muscles are to be placed, iniciating with back (temporalis and masseter muscles).

We continue with the muscles in the front of the face (orbicularis oris, buccinator, depressor labii inferioris, depressor anguli oris, zygomaticus minor and zygomaticus major).At this step, it is very important to have a good knowledge of human anatomy, in order to make muscles match the skull.

The last is the orbicularis oculi muscles. Note that have an image in right side. You can see a good article with anatomical description of a chimpanzee here.

Finished the muscles, it's time to make the eyes. 


And draw the nose and the expressions.

Put the ears using the reference pictures of juvenile apes.
It's a good idea to hide some parts of the face, in order to see if the structure is OK.

Finished the face, now is the time to put on some hair. Since this is a fast test, the hair is chosen to be fairly 'gross', giving less work.


One last view of the structure.

And the vector drawing is finished.


The vector is exported as an image and handled on to Gimp, in order to add some effects that ressembles a painting.


And to finish all the work, the classical cut image with the skull and the face reconstructed.


You can download the vectorial file HERE.

The next step will be the reconstruction in 3D of the face. I wait you there.

A big hug!


PS.: Thanks to FAR, that help me with the English.

Thursday, 1 November 2012

Taung Project: Recovering the missing parts of the skull


As was published in the last articles, we are working on the Taung Project, which involves the reconstruction of a 2.5-million-year-old fossil; not just reconstructing the face with soft tissue, but restructuring the entire skull as well.

The most important thing in this project is the technology that will be used, because evidently, all the results will be shared with the community. And the ‘community’ means everyone.


This article will describe the techniques in recovering the missing parts of the Taung child skull.

It's important to state at this point that all integrants of the Arc-Team work hard in their professions, so there will be times one would publish an article before another, when they have free time to share their
knowledge. Having said that, this article was written during someone’s free time, in the hopes that it might be useful to otherswho would read this blog. Below you’ll find the description of how the skull was scanned in 3D.

Describing the process


The skull was scanned in great detail for Luca Bezzi. The model was prepped for importing to Blender.


Unfortunately (or fortunately, for the nerds), a significant part of the skull was missing, as indicated by the purple lines. For a complete reconstruction, the missing parts needed to be recovered.

The first step was to recover the parts using a mirrored mesh in Blender 3D. You can see a time-lapse video of the process here.

This was sufficient enough to cover a large part of the missing area.

But even with the mirroring, a few parts were still missing.
How can this be solved?


An option was to use the CT scan of primates to reconstruct the missing parts at the mandible and other areas.

Obviously, the CT scan chosen was that of infant and juvenile primates.

You can found the tomographies in this link. They can be used for research purposes. To download the files, you'll have to creat an account.

The mandible is of a juvenile chimpanzee (Pan troglodytes). Viewd in InVesalius.

The reconstruction of CT-scan was imported (.ply) in Blender.

And placed on skull.


 But, beyond of the size bigger, the Australopithecus didn't have canines so big.

Using the Blender sculpting tools, it was possible to deform the teeth to make them appear less “carnivorous”…


…and make them compatible with the Taung skull.

To complete the top, the cranium of an infant chimpanzee (Pan troglodytes) was chosen.

ollowing the same process as before, the reconstructed mesh was imported to Blender…


 …and made compatible with the Taung cranium.

The overlapping portion of the cranium was deleted.

The same was done with the mandible.

The skull was completed, but with a crudely formatted mesh because of the process of combining different meshes.

The resulting mesh was very dense, as you can see in the wired orange part.

Why didn’t we use the decimate tool? Because the computer (Core 5) often crashes when this is used.

Why didn’t we make a manual reconstruction of the mesh? To avoid a subjective reconstruction.

How was this solved?

A fake tomography needed to be done to reconstruct a clean mesh in InVesalius. How? We know that when you illuminate an object, the surface reflects the light, but inside it's totally dark because of the absence of light.

So since Blender allows the user to start the camera view when needed, you can set up the camera to "cut" a space and see inside the objects.
The background has to be colored in white, so only the dark part inside the skull appears.

To invert the colors (because the bones have to be white in the CT scan), you can use Blender nodes…

…and render an animated image sequence (frame 1 to 120) of 120 slices.


Using the Python script IMG2DCM, the image sequence was converted in a DICOM sequence that was imported to InVesalius and reconstructed like a 3D mesh.

With IMG2DCM, it is possible to manually establish the distances of the DICOM slices, but in this case,the conversion was made with default values (because this is flattened), and the mesh will just be rescaled later on.


The reconstructed mesh is then imported and rescaled to match the original model.


The result is a clean mesh that can be modified with Remesh to come up with an object with 4-sided faces.

 Now, we only needed to use the sculpt tool for "sanding" the mesh.


To create the texture, the original mesh was used. A description of the technique can be viewed here.

When the mapping was finished, the rendering was done, and this step of the project was completed.

You can download the Collada file (3D) here.

I hope this article was useful and/or interesting for you. The next step is a previous 2D reconstruction as training for making the 3D final model.

See you there…a big hug!