Monday, 5 May 2014

Filming with a smartphone fixed in a kite

One of the goals that made me start writing ATOR's blog was the possibility of having access to interesting technologies without the need to purchase expensive software licenses, or even inaccessible hardware.
A very interesting example is the use of photographs to scan 3D objects. In this case, we replace (with limitations, of course) a laser scanners by a photographic camera and a program that calculates the 3D mesh using an algorithm that crosses data from photographs.
So far so good, but what about when we talk about drones? Is there a way to create a tool like a drone with what we have at hand and without spending much money?
Loosely speaking, fortunately the answer is yes!

To run the project we took a long holiday we had here in Brazil and I called my nephew who is a master kite builder. Thank very much for your help Patrick Pagliari!

Our challenge was to build a kite that could fly with a smartphone attached using only what we had in our homes.

As this was a great kite, the first challenge we had was finding rods with sufficient scale to meet our needs.
I live on a farm and we have lots of trees on the ground. Some time ago we had time heavy rains in my region with strong winds. These winds broke some branches of a mulberry tree (Morus nigra) that we have on this farm. Since they are lightweight and almost dried branches we decided to use them in the project.

We worked until night to cut the trunks, tie them and compose a kite with 7.5x the size of a normal kite.

The other day, with the small tail of the kite made​​, we made ​​the first flight test ... successful!


Then we reinforce a layer of silk paper and we pinned a smartphone in the kite (Samsung Galaxy Y Duos).

To solve the problem of the video, which was recorded with excessive movement of the kite, I edited it manually rotation in Blender.
After I imported in the Kdenlive and I enabled automatic stabilization to improve the result.

Now, for the second version of the project we intend to create a script that accesses the camera and take pictures with 3.1 megapixels, so we can do photogrammetry for large spaces.

I hope it works.

A big hug!

Friday, 2 May 2014

Raw data to WKT: a polygon

Hi all,
this is the last (for a while) videotutorial of the mini-series regarding WKT code. This time we see how to draw a polygon. As usual, you'll find the video also on the DADP wiki. Here is the video, I hope you'll find it useful!


Thursday, 1 May 2014

Raw data to WKT: a line

Hi all,
Again a short videotutorial about FLOSS in archeology. In the last one we saw how to turn raw data (from the total station) into the WKT code of a point; this time we will see how to create a line. 
This videotutorial is also available on the DADP wiki (I updated the old tutorial). 
Like before, the system I am using is a preview version of ArcheOS Theodoric, done building the iso image just following the instruction of the readme file on the github page.
Now, thanks to +Fabrizio Furnari we also have the project for an ArcheOS manual (still work in progress). If you want to help us, you will find the code on the github page (yes, we like github very much...). 
A great help it would be to translate these videotutorials into text :). If you want to participate to the documentation, you can contact us in many ways (also commenting this post), like the official IRC channel #archeos, or the developer mailing list (for more info, read the text here)
Here is the video, I hope it will be useful!

Wednesday, 30 April 2014

The Austro-Hungarian emplacements on top of Mt. Roteck

(2390m)
Dolomites / South-Tyrol 

 A case study for extensive survey and documentation on occasion of the 100th anniversary of the beginning of WW1 on the Italian front in May 2015.

As reported on ATOR in summer 2013, Arc-Team is pushing ahead the plan of  mapping extensive areas of the high alpine frontline of WW1 from the Swiss border to the Dolomites.
Our approach consists in a very detailed DGPS-survey, terrestrial structure from motion, geolocalized images, archeological description and aerial survey by our drone.
Of course we are basing the whole working process on Open Source Soft- and, where possible , also on Hardware.
Now we want to share the latest version of a presentation, given originally in occasion of the 7th Fields Of Conflict Conference in Budapest (Hungary) in October 18.-21. 2012.
It outlines the characteristics of the high alpine working environment, the nature of the WW1 remains, the challenges to meet, our project strategy and first results.

Thursday, 24 April 2014

The Andean child and the Happy mummy's Day! 3

Steps of facial reconstruction
She was so tiny and fragile that I feared catch her in my arms. She was wrapped in a blanket of plastic bubble and  filled with silica so she did not suffer the effects of moisture, she was in a corner of the Rosicrucian Egyptian Museum and surrounded by care and discretion on the part of the curators.
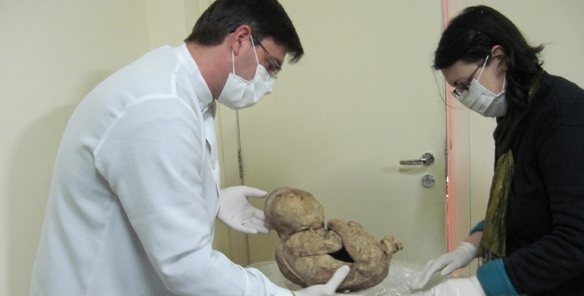
Dr. Moacir Elias Santos (archaeologist) holding the child and the curator Ms. Vivian Tedardi
 I met her in May 2013 when I participated in an event at the museum. On occasion I could not give much attention to the child, because at that time the star was Tothmea mummy. We were presenting the Egyptian mummy to the general public and the press. Even so, the Andean child entered the meeting topics and we was more or less agreed that the museum would mobilize for a CT scan in that little body girded with a lot of mystery and historical importance.
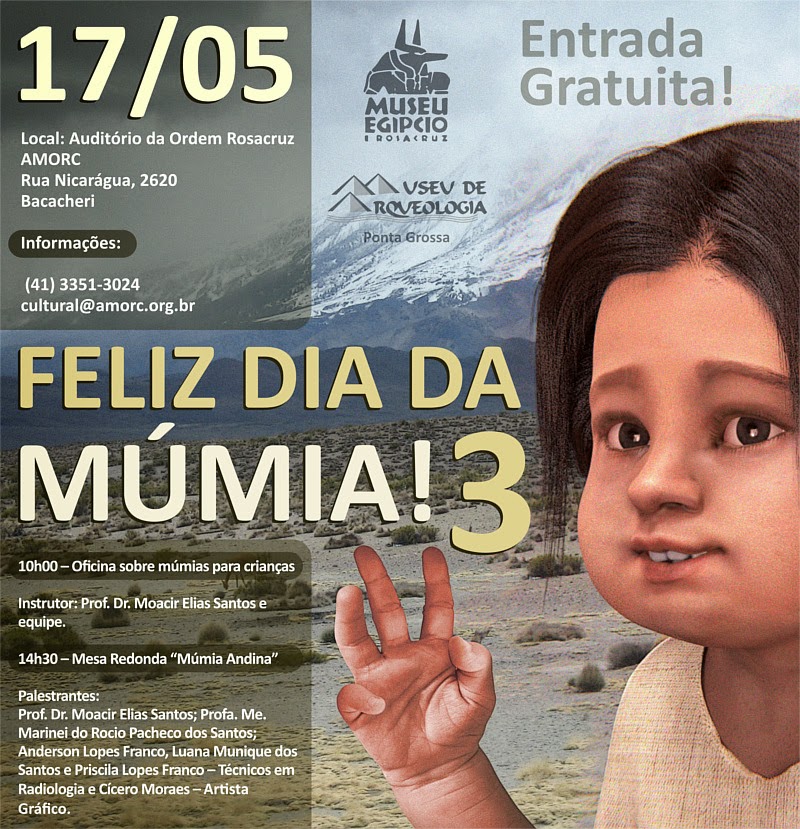
 
Poster of the conference in Portuguese

 Months later I learned that a group of IFPR (Federal Institute of Paraná) linked to the course of Radiology, was developing a job with the Andean mummy. Quickly I contacted the professor Marinei Pacheco and her student Priscilla Lopes. They accompanied tomography whole body of the child and they were working on the data so that they could with this, among other things, get to her age when she died.
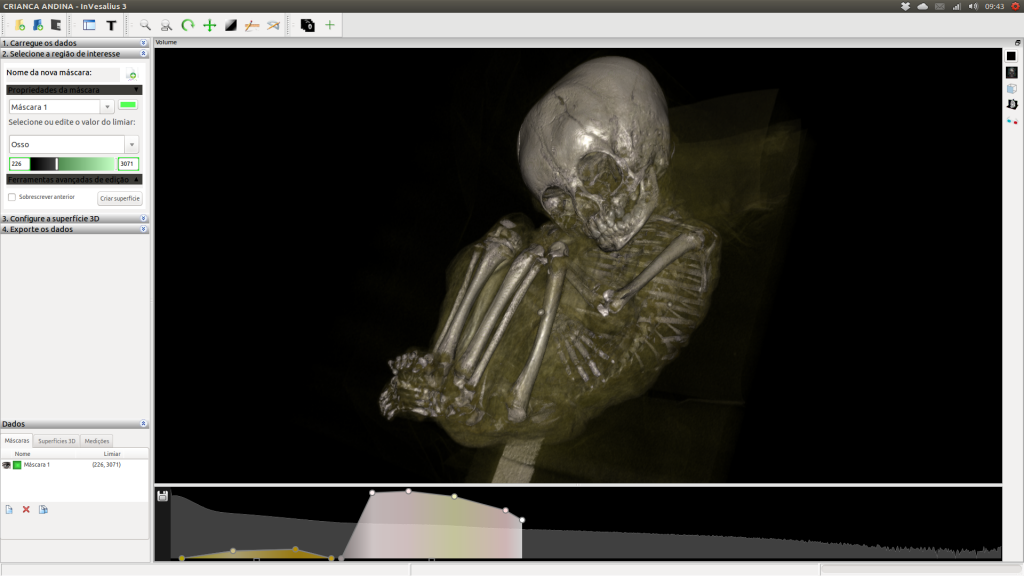
Reconstructed body from CT-Scan, InVesalius software
I was in Sao Paulo when I received the files of CT-Scan. I had a thousand things to do but I had to forget them for a while because I was blown away by what I saw. Sitting on the desk of the hotel I rebuilt the tomography for 3D. Initially it appeared the body of a very young child. By regulating the amount of transparency, the bones revealed them. I could even see the tiny spheres of silica. Something caught my attention that surrounded the tiny little arm of the mummy, a small bracelet that I did not notice at first.
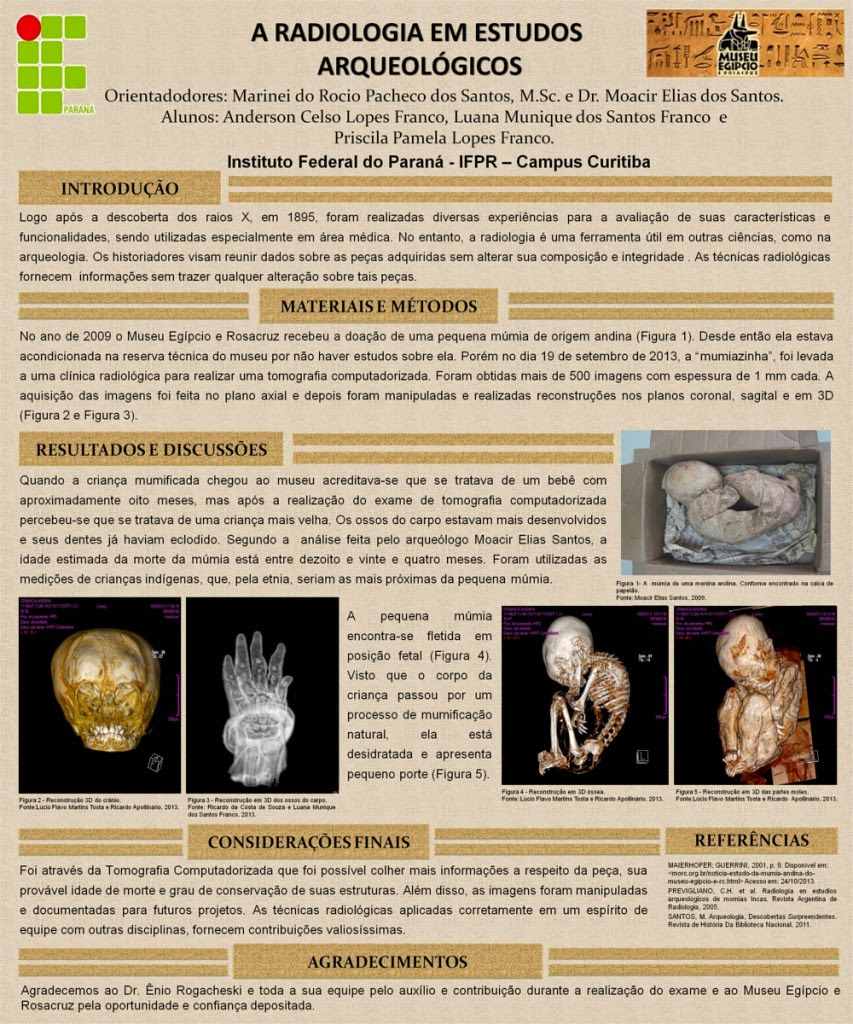
 
Banner (in Portuguese) made by the group of Radiology of IFPR

She was in an almost fetal position, hiding the face with the legs folded. Involuntarily I began to imagine how would have been the days of that child while she lived. What would have taken her to lose her life? How did your parents dealt with that? Where she lived in the Andes? The questions are many, but the answers... very few.
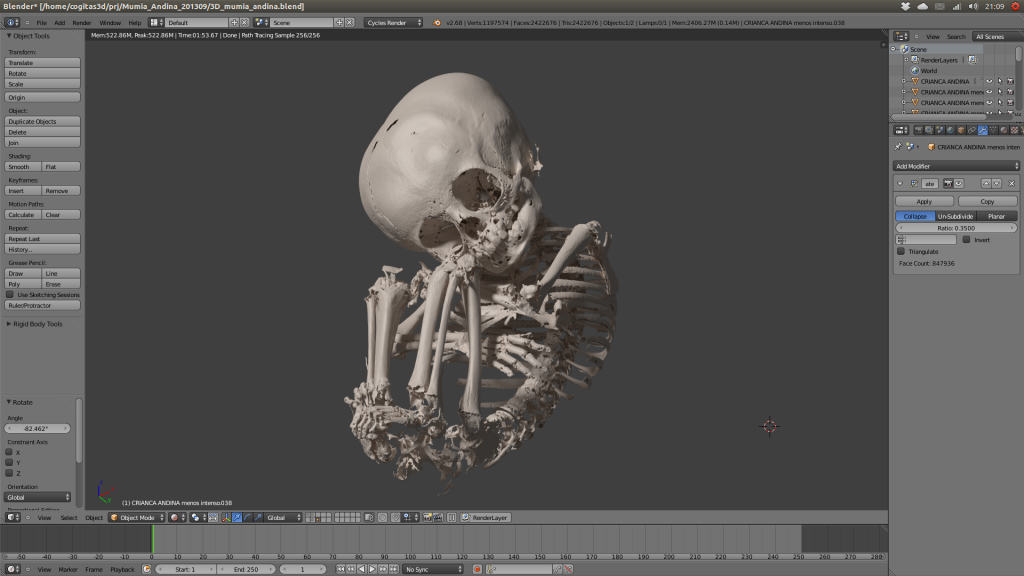
Only the bones imported in Blender 3D software
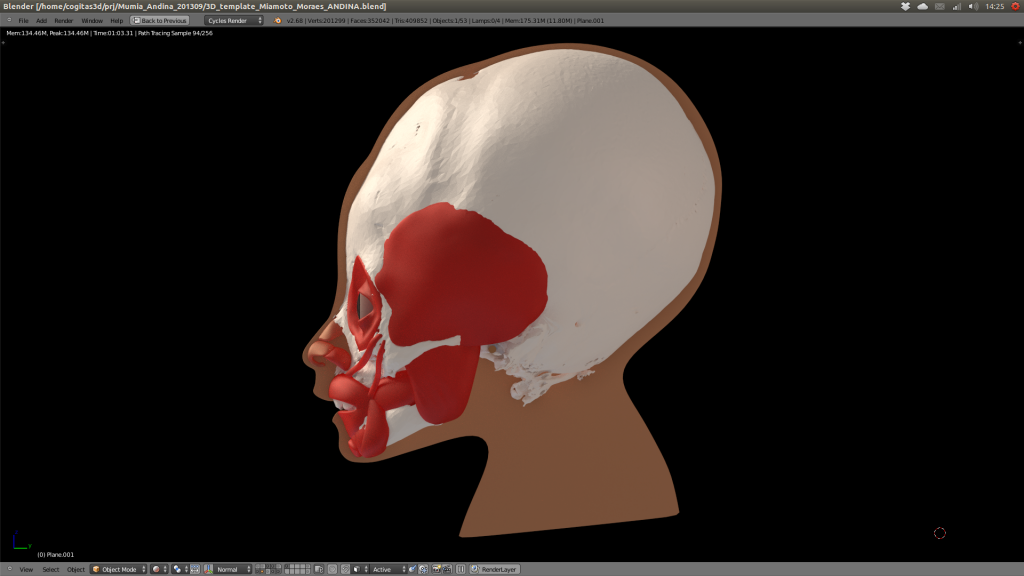
 So I returned to my town (2100 Km away), I began to reconstruct the face. Gradually appeared the face of a beautiful little girl, with slightly pronounced teeth. I decided to configure a sweet smile on that face, to immortalize a moment of joy during her brief life.
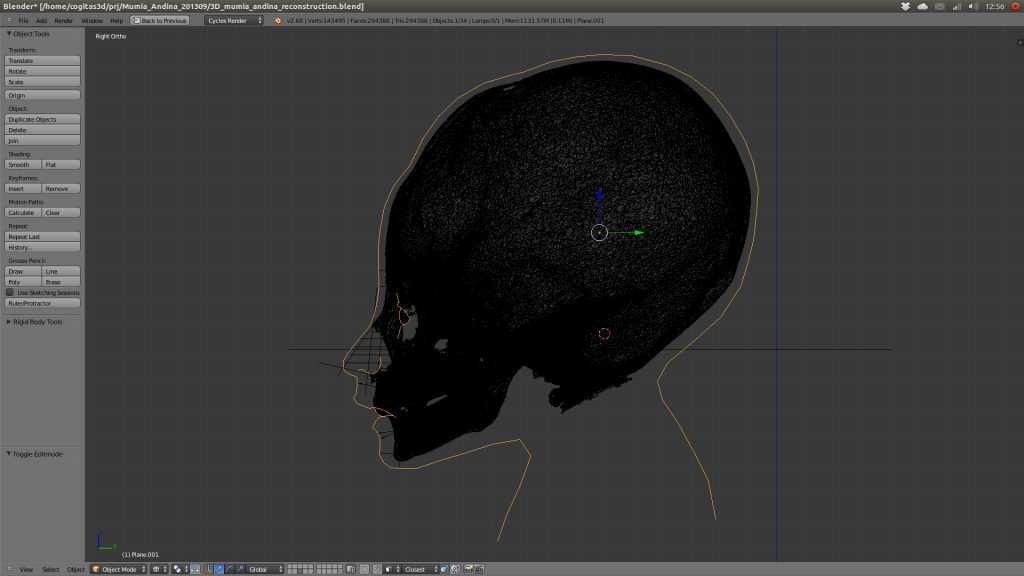
Soft tissue drawn from the depth markers
 The small Andean died long ago, I stay sad to see skeletons of children, but from this dismal history new friendships emerged. When Priscilla finished the work related to radiology, she posted on Facebook a photo with the scientific panel describing the process. In thanks she quoted a phrase taken from the post where I have explained the reconstruction of another child, actually a baby ... the baby mummy of St. Louis. I was extremely honored to happy at that time. The kids are gone, those who are here cooperating and facial reconstructions will gather in an ehxibition about childhood in antiquity. The small Andean mummy, after hundreds of years will have many little friends at her side.

 Returning to talk about Happy mummy's Day! few days ago I received the airline tickets by email and I quickly began to separate the images to compose the slides that will be presented at the roundtable where we discuss the project (about the Andean child). After so long working with this I still get inspired and eager for the day to come soon and I can show viewers the steps of modeling. More than making me anxious to present, I stay also in relation to what the other members will show. It will be the first time I will participate in an event where all the researchers who developed the process will speak on your part making up a complete picture of how things been made.
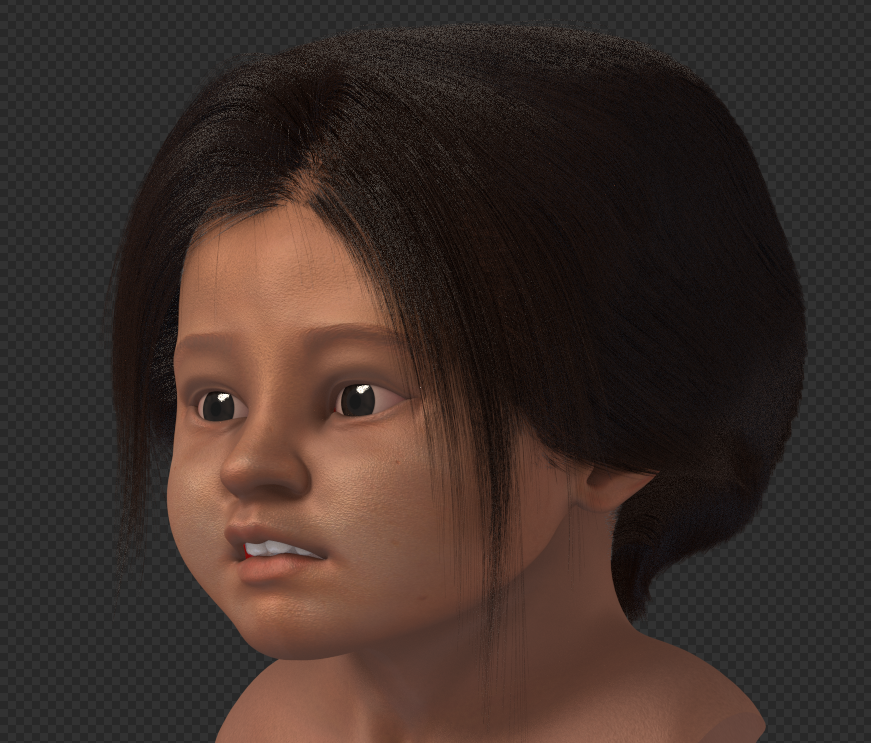
Preview render in one of the last steps of works
 This mix of viewpoints and different performances will surely drive this serie of experience to a new and exciting project where science will be the biggest benefited.

The presentation will happen at 17th of May and if you, dear reader, know someone in Curitiba-PR (Brazil), please, inform that person about the conference, besides being interesting the entrance is free.

Adress: Auditório da Ordem Rosacruz, AMORC (Rua Nicarágua, 2620 – Bacacheri).
Tel.: +55 41 3351-3024 or by the email: cultural@amorc.org.br

More informations (in Portuguese): http://www.amorc.org.br/noticia–16.html


A big hug and I see you in the next post! 

Tuesday, 22 April 2014

Arc-Team tries Large Scale Reflectance Transformation Imaging (RTI)


With the data, collected during our mission presented recently in the post „@MAP“the Arc-Team Mobile Mapping Platform, we've tried for the first time to apply a method called Reflectance Transformation Imaging (RTI) on landscape:

Aerial Photo of the project area taken from Arc-Teams Drone

„RTI is a computational photographic method that captures a subject’s surface shape and color and enables the interactive re-lighting of the subject from any direction. RTI also permits the mathematical enhancement of the subject’s surface shape and color attributes. The enhancement functions of RTI reveal surface information that is not disclosed under direct empirical examination of the physical object. (...) RTI images are created from information derived from multiple digital photographs of a subject shot from a stationary camera position. In each photograph, light is projected from a different known, or knowable, direction. This process produces a series of images of the same subject with varying highlights and shadows. Lighting information from the images is mathematically synthesized to generate a mathematical model of the surface, enabling a user to re-light the RTI image interactively and examine its surface on a screen.“ (http://culturalheritageimaging.org/Technologies/RTI/)

We've used the processing software and viewer of Cultural Heritage Imaging, their RTIBuilder software is made available under the Gnu General Public License ver. 3.


RTI is usually used for objects of small or medium size beause of the difficulty or impossibility to illuminate whole structures or even areas / landscapes.


At this point GIS comes to our aid:

Starting from a DTM it's easily possible to create shadow reliefs with GRASSGIS' module r.shaded.relief. 
The highlight of the module in our case is the capability to modify the altitude of the sun in degrees above the horizon and the azimuth of the sun in degrees to the east of north. 


In this way we could produce artificially the needed data for our RTI-landscape attempt. 
The next step was to export from GRASS a set of 60 images with different lighting positions creating an imaginary light dome around the object:


At this point we reached the first bottelneck of our approach:

Usually, you include at least one reflective sphere in each shot. 

The reflection of the light source on the spheres enables the processing software to calculate the light direction for that image. 

So we had to create and copy in every image a fake sphere with the reflection corresponding to the sunlight direction choosen in GRASS.

It was a stiff piece of work!

At the end everything was ready for processing the images in RTIBuilder. The single steps in the software are very easy to execute and well described on the ProcessingGuide. 

We've just had some problems with the size of our images (8200x6500 pixels), which the software couldn't process, but maybe it was because of the age of our hardware...

After reducing the image-size everthing worked fine...


At the end, after installing also RTIViewer, we've held in our hands an interactive scene of an archaeological site of nearly 10.000m2 which is almost invisible from the ground.


Monday, 21 April 2014

„@MAP“ the Arc-Team Mobile Mapping Platform


In Summer 2013 Arc-Team was charged with the task to survey a micro-DTM on an archaeological area of about 10.000 m2.
The underlying archaeological remains on the side cause small differences in height on the surface and the shape of a nearly 60 x 60 meters large structure was known from aerial photographs.


We've had only 10 hours of fieldwork at our disposal and exploring our options we've made some numbers games:
  • Doing the job with total station would allow us to take an average of 5 points per minute, which means a (very optimistic) total amount of 3000 points in 10 hours. (2 operators)

  • Using our DGPS, the stroke per minute increases up to a maximum of 15 points per minute, working with continuous point capturing mode, having an operator on the field who's stepping forward, putting down the pole and balancing the bubble eyery 4 seconds. The total amount in this case is about 9000 points. This means an average of only 0,9 points / m2. That would be far to few...


So what would we going to do?

In this occasion we've had the idea to adapt a monocycle in order to have a rollable vehicle carrying the GPS antenna and maintaining a constant distance to the ground.
The result you can admire in the illustration below.


By the help of this tool we were able to increase the stroke on 42 points / minute and a total amount of almost 25.000 points. This means an average of at least 2,5 points / m2.


The result of our efforts was quite lovely: GRASS GIS produced a high quality DTM from which we derive 3D views, isolines and shaded reliefs.

The official name of the trolley is „@MAP“ Arc-Team Mobile Mapping Platform. ;-)

BlogItalia - La directory italiana dei blog Creative Commons License
This work is licensed under a Creative Commons Attribution 4.0 International License.