Showing posts with label archaeological excavation. Show all posts

Thursday, 27 April 2017

ArcheOS Hypatia and Archeorobotics: ROS for 3D dynamic documentations

Dynamic 3D documentation is a technique we are using more and more in professional archaeology. It can be useful to map in a very fast way any kind of earth-moving work during negative archaeological controls (from wide open area to small trenches, like we did here) or to record in real-time archaeological evidences and layers during a normal excavation (like the video below).


Using this methodology during an ordinary project allows us to perform the segmentation of the 3D model directly on the field (within the software Cloud Compare), dividing each layer of palimpsestic documentation (we spoke about this problem during our presentation at the CHNT conference 2016). This solution avoid long post-processing operations, and it is ideal to spare time and money in low-budget archaeological investigations. For this reason we are evaluating the possibility to insert ROS (Robot Operating System) in ArcheOS Hypatia.
I hope to give you soon good news about the release of the next version of ArcheOS. In the meantime stay tuned to follow our research in testing new Open Source and Free Software. Like always, if you want to help in the development, just contact us in one of our channels: FaceBook, YouTube or Blogger
Have a nice day! 

Friday, 21 October 2016

Torre dei Sicconi - Chapter 6 - Excavation

The archaeological excavation is still one of the most important steps during a research project like "Torre dei Sicconi". 
The main goal was to understand the construction phases, to get information about the composition and ornamentation of the interiors and the every day live of the inhabitants of the castle.  
Watch in the next chapter of our "Torre dei Sicconi" series Arc-Team excavating between the walls of the medieval castle ruin.

Enjoy!

Torre dei Sicconi - Chapter 6 - Excavation


Monday, 19 September 2016

Torre dei Sicconi - Chapter 2 - On the way to new discoveries

The second chapter of our video, talking about historical and archaeological research and virtual reconstruction of a medieval calstle.

This time we are locating the site and finally going to work.

Enjoy!

Torre dei Sicconi - Caldonazzo - Monte Rive: Chapter 2 - On the way to new discoveries


Thursday, 15 September 2016

Torre dei Sicconi - Chapter 1 - A long time ago...

The Castle of Torre dei Sicconi (Tower of the Sicconi clan) was destroyed by troops from Verona and Vicenza in 1385.

For that reason we don't know how the building looked like in the Middle Ages.

One way to learn more about the original shape of the complex is reading historical sources which are speaking about the Torre dei Sicconi castle and it's single parts.

Some of them we would like to present in the first chapter of our film:

A long time ago...


Watch also the trailer of 

Wednesday, 6 July 2016

Arc-Team: Open your Mind and share your Knowledge

Arc-Team Archaeology was founded in 2004 as a way to open Archaeology to people through a free & open approach.

Since the first day we have shared our experiences with this type of research with our friends and colleagues.

We are still searching for new horizons and there is no better way than being able to open our mind and share our knowledge.

Let's go on collaborating and sharing our results, our techniques and our experiences!


Thursday, 15 August 2013

OpenJUMP: query to extract single points from a general vector layer

Hi all,
today I am working on data elaboration of an archaeological excavation. I decided to record a short videotutorial to show how to perform a very simple query in OpenJUMP (which is a topic I am often asked to explain during lessons about archeology and open source). Before to start, I'll write a short introduction regarding the processing of this data, just to understand why I need to perform this kind of query. 
I worked on this excavations collecting all the data in a local system (with simple 3D Cartesian coordinates), because the job was an emergency archeology project and I did not have the time to set up a geographic coordinate system on the field, before the construction site began. Just at the and of the excavation, I could come with a RTK GPS, to collect some Ground Control Points (GCP) in UTM WGS84. This is the reason why in this time, when I am processing the data, I had to put together all the daily total station downloads in a single cvs file, which I georeferenced in OpenJUMP, using the GCP I collected with the GPS. The problem is that now I will have to separate again the single points, grouping them according to their function (e.g. points for photomapping of area 1, height points of the same area, points for SfM georeferencing, find-points and so on...). To do this operation, I will simply use OpenJUMp (where I loaded and georeferenced the csv file), performing a query on the attribute (the name) of cumulative vector layer , which will tell me where are the the points I need. In this way I can select in the GIS the features I am looking for and put them in a new vector level, copying the db schema of the cumulative layer (name, y, x, z, code). At the end of the process, I will have single separated vector files which I will use in the next steps of data processing (photomapping, 3D, ecc...).

Here is the videotutorial I uploaded in the ArcheOS tutorila wiki (rom Insbruck University):


I hope it was useful, have a nice day!

Wednesday, 14 November 2012

Geoarchaeology with "terrazzo" tiles.

In this post I would like to describe a geoarchaeological analysis based on tiles built with the “terrazzo” technique. These tiles are made of sedimentary material, coming from the different layers of an archaeological excavation, poured with a cementitious binder (normal Portland cement) and then polished with a lapping machine.
This methodology has many advantages:
  1. It is relatively simple and inexpensive
  2. It allows a sistematic storage of the samples
  3. It allows analysis difficoult to achive (or not feasible) in other ways
Sample preparation

It is better to start with a copious sedimentary sample (at least 1 Kg) and sieve it to define a series of size ranges (16-8 mm, 8-4 mm, 4-2 mm, 2-0,06 mm), that will be used to build the tiles. Then we have to prepare some wooden molds with the preferred size (e.g. 30 x 20 x 5 cm) and to mix the sedimentary material with Portland cemenet, water and 1 dl of Vinavil glue. When the mixture is ready, we can put it in the wooden box and let it dry for a couple of days. After this time, if the cement is hard enough, we have to polish one of the larger faces of the tile with a lapping machine (for this operation we asked the help of a marble cutter). Now the sample preparation is complete (see the image below for an example).

An example of "geoarchaeological terrazzo tile"


Geoarchaeological analysis

The procedure described above allows to build a geoarchaeological archive, storing the sedimentary material of different excavations for future comparison.
The tiles built with the “terrazzo” technique expose a section of the components of the sedimentary material, in which it is possible to observe their genetic colour, their framework (internal structure) and their edge (on a random axis). The same parameters could not be visible on intact samples, due to the small size of the components and to their external surface, which is often dirty and altered.
On one hand, observing the colour and the framework of the sediment, it is possible to do some petrological analysis to determinate the rocks and minerals tipology, which could help in understanding their origin and the spatial distance they covered. On the other hand, the edge of the sediment gives morphologic and morphometric informations, which can explain the kind of transport (and the agent) the material was subject.
In the next days we will try to perform some of these analysis in a GIS to evaluate the potentialities of this kind of software also fo such a specific need.

Sunday, 14 October 2012

Extreme SfM: precarious situations and workplace safety

This post is a further contribution regarding the main benefit of SfM: its versatility. 
Thanks to its speed during the phase of data acquisition, this technique allows us to intervene quickly in the case where the archaeological excavation exposes precarious situations, often related with collapsing structures.
The image below is good example: we were working in the vicinity of a church, checking the excavator. The left pictures shows the part of a wall which was exposed during this operation, while the right photo reports the same subject just twenty minutes later.

The wall befor and after the collapse
Luckily, seen the precaurious conditions of the structure, we decided to document it with SfM and IBM techniques, and this is the 3D restitution of the wall before the collapse.

The 3D model of the wall
However, the documentation of archaeological arthefacts before their destruction, is just one of the benefits of SfM (mainly related with the speed during data acquisition). In fact the versatility of this technique is strongly connected with the hardware we need to collect the data: a simple digital camera. This make it possible to work without the necessity of a direct contact with object to be documented (especially if we can support the excavation with a direct reflex total station, to record the Ground Control Points needed in the post-processing georeferencing operations). This way to operate lead to minimize the risk and increase the safety in the workplace. The images below regard an example of this situation: sometimes it happen to be called to evaluate the damnages of costruction sites, already underway without the archaeological control. In these cases it can happen to document precarious situation, but, using SfM techniques, there is no need to stand in risky places (like under a section with many gravel layers), because all the operations can be done from a safety distance.

The gravel section


The 3D puincloud (thin points)
The 3D pointcloud (thik points)
 I hope this post was useful, have a nice day!

Monday, 1 October 2012

Kinect 3D outdoor: hacking the hardware

Some weeks ago I finally found the time to modify our Kinect in order to test it outdoor. 
My main problem was the power supply, while in an archaeological excavation it can be difficoult to find an access to electricity. The solution was obviously an external battery, but I did not know the right voltage and amperage. Finally I found this interesting post, in Ken Mankof blog, with all the necessary informations to hack Kinect for the fieldwork.
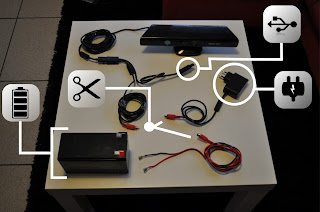
I tried to summarize all the operations I did in the image below:

The modified Kinect
As you can see, Kinect's main cable ends with an USB (for data transfer) and with an electric plug (for power supply). I cut the cable before the elctric plug and I added a connectors pair, positioning the male one on the Kinect side and the female one on the electric plug side. Then I prepared another cable with a female connector at one end and two different female blade connectors (faston) on the other end (one for the positive and one for the negative exit). The two female blade connectors are compatible with the two terminals (red/positive and black/negative) of a lead battery (12 V, 7.2 Ah).  In this way it is possible to switch Kinect form the electric net to the battery, simply plugging and unplugging the right cables.
After the hardware modification I was able to test Kinect outdoor. I will write soon a post with the results.
 
BlogItalia - La directory italiana dei blog Creative Commons License
This work is licensed under a Creative Commons Attribution 4.0 International License.