Sunday, 10 March 2013

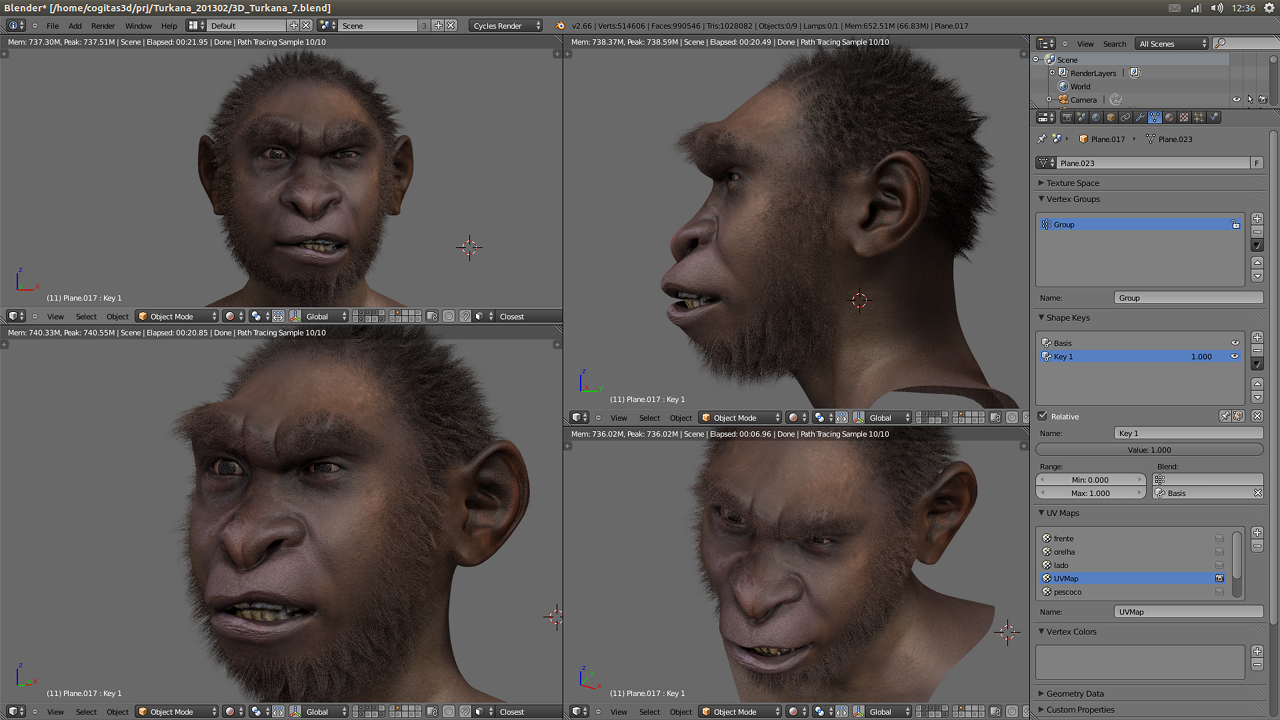
Homo habilis - forensic facial reconstruction step-by-step (screenshots)

Last but not least, I finished the reconstruction of a Homo habilis to be exposed at an event about human evolution in May 2013.

I chose to close with this model because I saw an opportunity to test a new methodology.


Upon receiving the skull reconstructed by Prof. Dr. Moacir Elias Santos, it was evident that besides not being very symmetrical parts were missing.


To harmonize the view without losing data, was enough to mirror the object in the X axis But there was still part of the zygomatic arches, and jaw.


Through deformation via Edit Mode (Blender 3D) with Connected activated, it was possible to deform the skull of a chimpanzee until it to conform with the model scanned and imaged.


The details of the reconstruction can be seen in an album I created in Picasaweb:


Follow the step-by-step via screenshot and see how the work was produced, starting in the import of the skull and ending in the final render.

----


These hominids reconstructions are "sons" of Taung Project.

It is a group work by internet in Italy and Brazil.

So, I have to thank some people to make this project possible:

Alesandro and Luca Bezzi (IT)
Giuseppe Naponiello (IT)
Arc-Team (IT)
Moreno Tiziani, Antrocom (IT)
Dr. Nicola Carrara (IT)
Antropological Museum of Padua (IT)
Prof. Dr. Moacir Elias Santos (BR)
Vivian Noitel Valim Tedardi (BR)

Thank you very much!


Saturday, 9 March 2013

SfM for Underground Documentation

Since last October Arc-Team is working on a challenging project about World War 1 on the southwestern frontline 1915-18.
Austro-Hungarian artillery piece in wintry position 1916
In a few years we will celebrate the 100st recurrence of the Italian declaration of war against the Austro-Hungarian Empire in May 1915.
For that reason the South-Tyrolean Heritage Departement was starting an extensive archaelogical survey campaign in high alpine environment up to 3900 m.s.l.
We've had to find out a rapid, lightweight and low cost method to document the uncountable amount of structures along both front lines.
The area of our pilot project is an approximately 6 sqkm large high plane between 2000 and 2300 m.s.l. called Plätzwiese. Between 1915 and 1917 it was a strongly fortified second line artillery position of the Austro-Hungarian Army.

Crew Cavern
Because of the seclusion of this area, today there we can find some of the best preserved residues of WW1 in Europe. We expect a total amount of more than 1000 archaeological remains just in this sector.
One of the major challenges is the documentation of the numerous tunnels and caverns driven in to the rock to protect troops and material from enemy artillery fire.

View towards the exit


We apply SfM to obtain pointclouds of the interiors, dealing with difficult conditions of illumination and space. After placing GCP's around the entrance(s) and measuring them with our DGPS, we start with one or more sequences of pictures in the entrance area, advancing along the tunnels, turning at their end and coming back to the starting point.

In the dark we use of course a tripod to allow long exposures and some torches, to illuminate shadow areas.
In this way we've taken up to 300 pictures for one single structure.
Various attempts of processing them in Python Photogrammetry Toolbox divided in a few single sequences, gave us some indication of the most advantageous way of photographing.

Point Cloud in MeshLab v1.3.2.

For good results we need to follow two important rules:

  1. Redundancy: The same point has to be visible in much pictures possible.
  2. Long baseline: To obtain correct geometrical information, the projection centers of the sensors have not to be to close together.

  • Taking a just a single photo-sequence along one way of the cavern, causes often problems with redundancy and subsequently lead to empty areas in the pointcloud, especially along the ceiling of the cavern.
    Recording strategy 01
    • Another of the experiences gained, is that the software has big difficulties to match features form the photo-sequence taken on the way inwards, with features from the photo-sequence taken on the way back to the entrance of the tunnel.
    Recording strategy 02

    • We get the best results advancing on two parallel lines, as well on the way in, as on the way out of the structure.
    Final result 01

    Finally we processed the parallel sequences of each direction and referenced them after in Cloudcompare in the way how Ale Bezzi described it.
    Final result 02
      In June 2013, after the thaw, we will resume fieldwork in Plätzwiese and we hope to  acquire further experience.


      Thursday, 7 March 2013

      New tutorial in the Mesh Editing session of DADP

      Hi all,
      after my teaching in the Master Open Téchne 2013 about Computer Vision (SfM and IBM), i'm updating the Mesh Editing session (english page) inside the Digital Archaeological Documentation Project.

      Up to now I inserted four videotutorials:

      how to create a poisson mesh inside MeshLab


      how to georeference a point cloud in CloudCompare using a Cartesian coordinates system


      how to erase not useful points inside CloudCompare


      MeshLab: difference between vertex color, raster color and texture 


      how to import Bundler's camera positions inside MeshLab


      i hope this is useful :)

      Neanderthal II - time lapse video of a forensic facial reconstruction by Sculpt Mode on Blender


      I really fell in love by Cycles and Sculpt Mode in Blender. It's fun and nice to work this way.

      Thereby, when a person is in this state of mind, nothing more understandable than to show for everybody his passion.

      A way that I found to do this thing, was editing a video in time lapse of the process of reconstruction.

      Originally was recorded a lot of hours of FullHD video (22 GB of raw data!), edited in few more than 13 minutes.


      I hope you enjoyed.

      A big hug and I see you in the next!

      Homo heildelbergensis - forensic facial reconstruction with Sculpt Mode on Blender


      In the last article I showed a forensic facial reconstruction rendered in Cycles.

      I think that is an excellent renderer and already is my mainly tool for this task.


      After change of renderer I experienced the new way to modeling: using the Sculpt Mode on Blender.

      This is an interesting alternative to make more realistic surface, with all irregularities of an organic shape. And the most important: It's fun!


      When you sculpts in blender, you have to make it in steps, starting in one subdivision of mesh until the number you need.

      I'm not an expert in sculpting, but if you wanna more information about this technic, and even try to do it, see this videotutorial: http://cgcookie.com/blender/2012/06/13/creating-realistic-head-blender/

      I hope you enjoyed.

      A big hug!


      Turkana boy - forensic facial reconstruction rendered in Cycles

      Second Wikipedia:

      Turkana Boy, also occasionally, Nariokotome Boy is the common name of fossil KNM-WT 15000, a nearly complete skeleton of a hominid who died in the early Pleistocene. This specimen is the most complete early human skeleton ever found. It is 1.5 million years old. Turkana Boy is classified as either Homo erectus or Homo ergaster.

      The new and interesting thing about this reconstruction is that for the very first time I used Cycles to render the images.

      Cycles is a internal renderer in Blender that have global illumination and allow you see the rendered image almost in realtime.


      This is not a so new technology,  but in Blender 2.66 is already possible rendering hair, what was not possible in past releases.


      If you wanna more information about how Cycles works, please see here: http://www.blenderguru.com/videos/introduction-to-cycles/

      If you wanna know how configure hair in CYcles, see this link: http://www.blenderguru.com/videos/how-to-render-hair-with-cycles/

      I hope you enjoyed.

      A big hug!

      Homo erectus pekinensis - Forensic facial reconstruction using a CT-Scan reference

      Second Wikipedia:

      "Peking Man, Homo erectus pekinensis, is an example of Homo erectus. A group of fossil specimens was discovered in 1923–27 during excavations at Zhoukoudian (Chou K'ou-tien) near Beijing (written "Peking" before the adoption of the Pinyin romanization system), China. More recently, the finds have been dated from roughly 750,000 years ago, and a new 26Al/10Be dating suggests they are in the range of 680,000–780,000 years old."


      In order to make this facial forensic reconstruction was used a CT-Scan of a modern man.

      After it was reconstruction in 3D and imported in Blender, a modifier called Lattice was used to make the deformation of the skull (and the skin) to match with the pekinensis skull.


      The sequence of reconstruction process was the same used in Taung Child.

      I hope you enjoyed.

      A big hug!

      BlogItalia - La directory italiana dei blog Creative Commons License
      This work is licensed under a Creative Commons Attribution 4.0 International License.